Note
This article was last updated on 01/30/2025 for readability and updated URLs
I know there are hundreds of posts out there on how to do this, but I really documented this for my future self as something that is really fast, easy, and repeatable when I need to stand up a lab for testing with Azure AD and Intune :)
Warning
I am not a CA expert, but I did do some research to make sure I’m not doing something dumb like using DES. TL;DR - don’t use this for prod ;)
OpenSSL Offline Root CA
Before we start, I love using LXC containers in my lab, but obviously we wouldn’t use this method in production. You could also use a VM, WSL, or maybe even OpenSSL on Windows or macOS for a lab, but production should use a hardware security module (and someone with expertise).
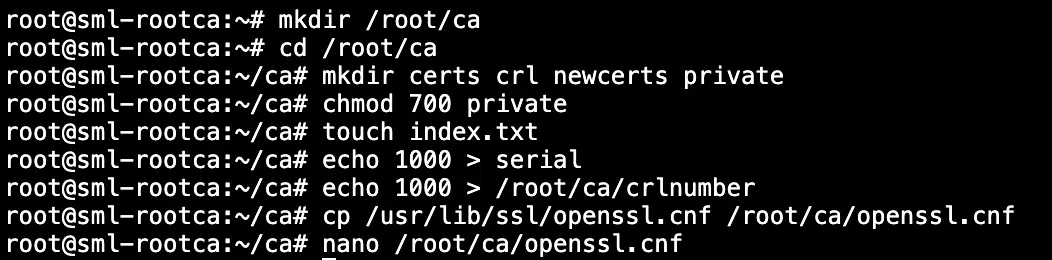
First, let’s create the LXC container, hop into it, and stage our working directory:
 1lxc launch ubuntu:jammy rootca --profile default
 2lxc exec rootca bash
 3
 4mkdir /root/ca
 5cd /root/ca
 6mkdir certs crl newcerts private
 7chmod 700 private
 8touch index.txt
 9echo 1000 > serial
10echo 1000 > /root/ca/crlnumber
11cp /usr/lib/ssl/openssl.cnf /root/ca/openssl.cnf
12nano /root/ca/openssl.cnf
I think it’s important to look through the various options in the default openssl configuration file as it leads to discovery, asking questions, and better learning how all of this stuff works :)
Now, you could go through and modify the settings based on what I’ve listed below, but you may find it easier delete openssl.cnf (rm openssl.cnf), modify the contents below (change certificate, crl, private_key, and the two URLs), and then paste it into a new blank openssl.cnf file (nano openssl.cnf, right click to paste, then control+o to save).
 1[ ca ]
 2default_ca       = CA_default
 3
 4[ CA_default ]
 5dir              = /root/ca
 6certs            = $dir/certs
 7crl_dir          = $dir/crl
 8database         = $dir/index.txt
 9new_certs_dir    = $dir/newcerts
10RANDFILE         = $dir/private/.rand
11certificate      = $dir/certs/SMLRootCA2023.crt
12serial           = $dir/serial
13crlnumber        = $dir/crlnumber
14crl              = $dir/crl/SMLRootCA2023.crl
15private_key      = $dir/private/SMLRootCA2023.key
16name_opt         = ca_default
17cert_opt         = ca_default
18crl_extensions   = crl_ext
19default_days     = 3650
20default_crl_days = 365
21default_md       = sha256
22preserve         = no
23policy           = policy_match
24
25[ policy_match ]
26commonName       = supplied
27
28[ req ]
29default_bits       = 4096
30distinguished_name = req_distinguished_name
31x509_extensions    = v3_ca
32string_mask        = utf8only
33
34[ req_distinguished_name ]
35countryName         = Country Name (2 letter code)
36stateOrProvinceName = State or Province Name (full name)
370.organizationName  = Organization Name (eg, company)
38commonName          = Common Name (e.g. server FQDN or YOUR name)
39commonName_max      = 64
40
41[ v3_ca ]
42subjectKeyIdentifier   = hash
43authorityKeyIdentifier = keyid:always, issuer
44basicConstraints       = critical, CA:true
45keyUsage               = critical, digitalSignature, cRLSign, keyCertSign
46
47[ v3_subca ]
48subjectKeyIdentifier   = hash
49authorityKeyIdentifier = keyid:always, issuer
50basicConstraints       = critical, CA:true, pathlen:0
51keyUsage               = critical, digitalSignature, cRLSign, keyCertSign
52authorityInfoAccess    = @v3_root_aia
53crlDistributionPoints  = URI:http://rootca.sharemylabs.com/SMLRootCA2023.crl
54
55[ v3_root_aia ]
56caIssuers;URI=http://rootca.sharemylabs.com/SMLRootCA2023.crt
57
58[ crl_ext ]
59authorityKeyIdentifier = keyid:always
60issuerAltName          = issuer:copy
Note
Be sure to change the URLs at the bottom to a FQDN where you can host the public certificate and CRL on a website (I will show how to use Azure Static Websites)
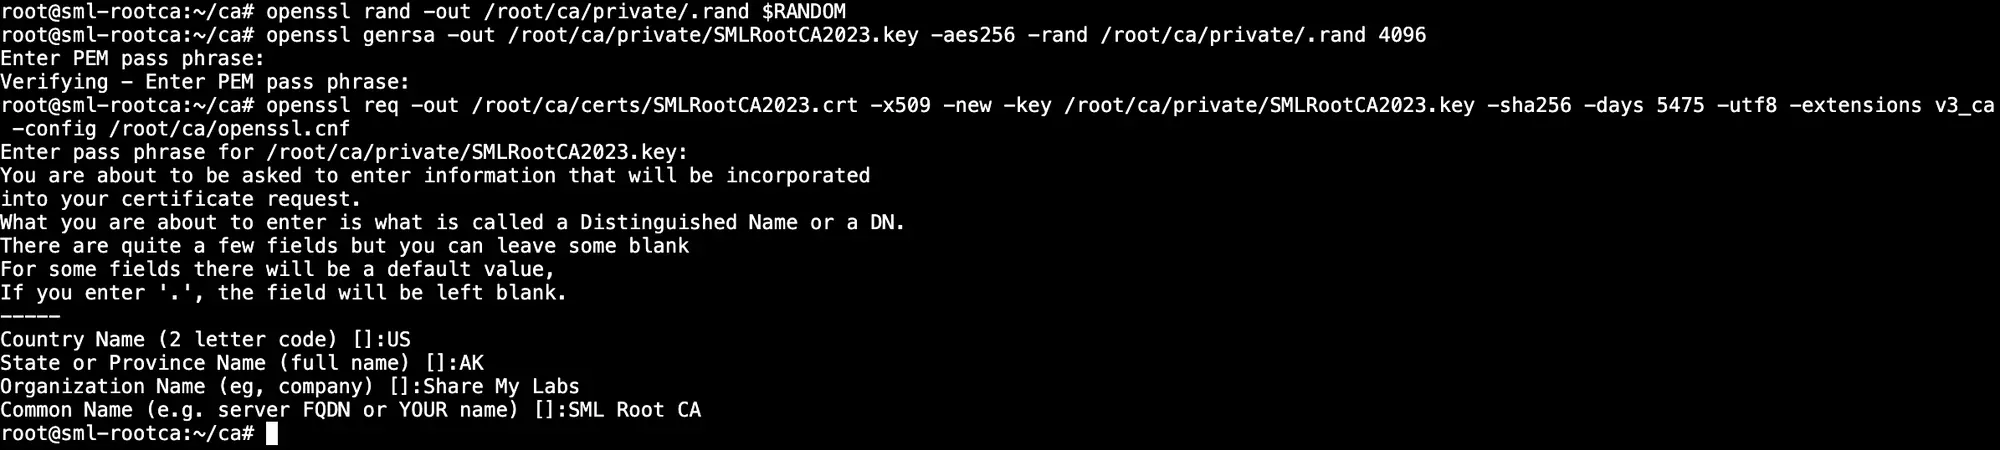
Next, we’re going to create a random file, then use it in our private key generation, and then we’re going to submit a request to self sign our CA certificate.
1openssl rand -out /root/ca/private/.rand $RANDOM
2openssl genrsa -out /root/ca/private/SMLRootCA2023.key -aes256 -rand /root/ca/private/.rand 4096
3openssl req -out /root/ca/certs/SMLRootCA2023.crt -x509 -new -key /root/ca/private/SMLRootCA2023.key -sha256 -days 5475 -utf8 -extensions v3_ca -config /root/ca/openssl.cnf
Active Directory Certificate Services (Intermediate CA)
Now that we have a root CA in place, let’s set up Active Directory Services as our Intermediate CA. We could use PowerShell (Add-WindowsFeature Adcs-Cert-Authority -IncludeManagementTools), but I think it’s helpful to show the GUI for most folks who are just wanting to play in a lab:
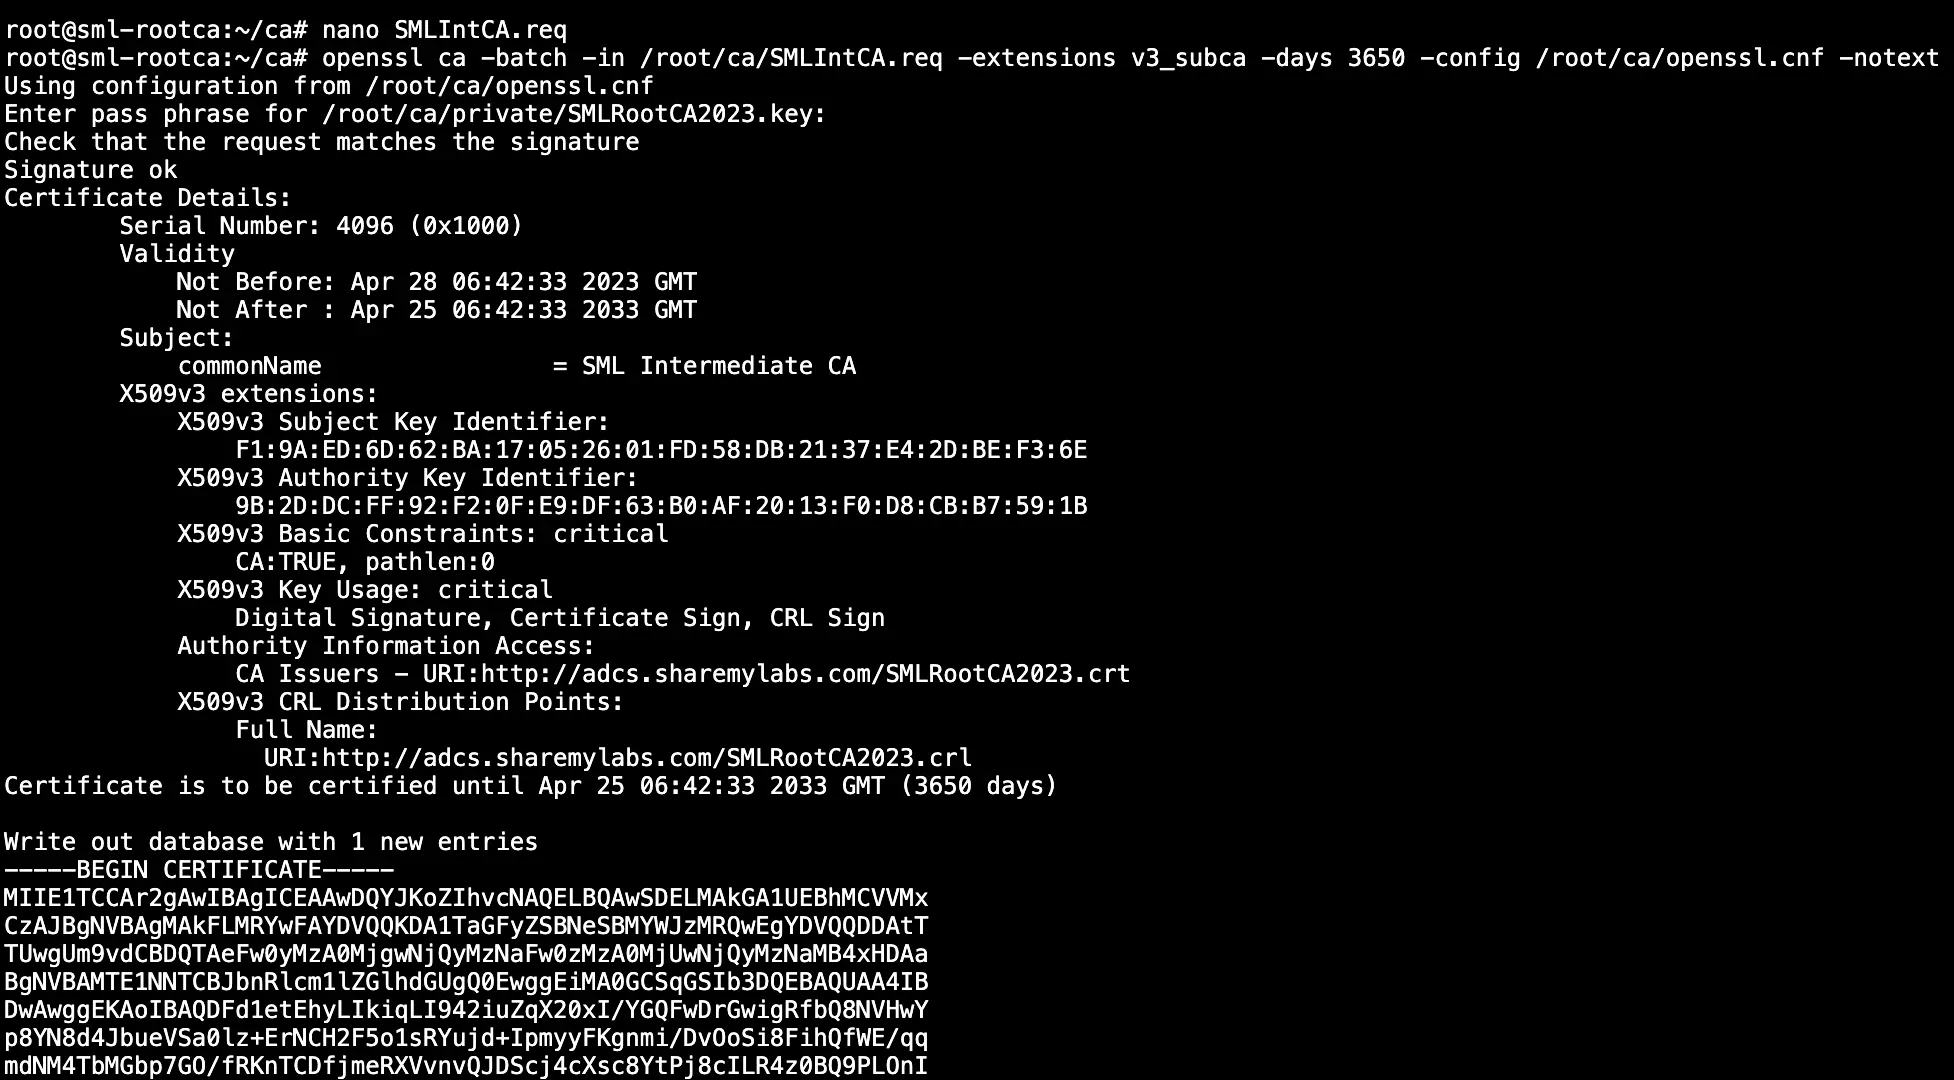
Now, we could SCP the request file to our Linux box, but I like to cheat and just copy the contents of the .req file that was created in the root of the C:\ drive and paste the contents into a .req file in the /root/ca directory. Now we need to sign the Intermediate CA certificate by running the following:
1openssl ca -batch -in /root/ca/SMLIntCA.req -extensions v3_subca -days 3650 -config /root/ca/openssl.cnf -notext
Next, we want to create the certificate revocation list by running the following:
1openssl ca -gencrl -config /root/ca/openssl.cnf -out /root/ca/crl/SMLRootCA2023.crl

Finally, we want to create the certificate chains and get all the files copied over to our ADCS server :)
1# Create PEM chain
2cat /root/ca/newcerts/1000.pem /root/ca/certs/SMLRootCA2023.crt > /root/ca/certs/SMLIntCA2023.crt
3
4# Create P7B chain
5openssl crl2pkcs7 -certfile /root/ca/certs/SMLRootCA2023.crt -certfile /root/ca/newcerts/1000.pem -out /root/ca/certs/SMLIntCA2023.p7b -nocrl
6
7# Create P7B chain with CRL
8openssl crl2pkcs7 -in /root/ca/crl/SMLRootCA2023.crl -certfile /root/ca/certs/SMLRootCA2023.crt -certfile /root/ca/newcerts/1000.pem -out /root/ca/certs/SMLIntCA2023withCRL.p7b

To get the files off the server, we can use SCP, WinSCP, or my favorite, copy the file through Tailscale. I zipped the entire /root/ca folder and sent it over.
GitHub
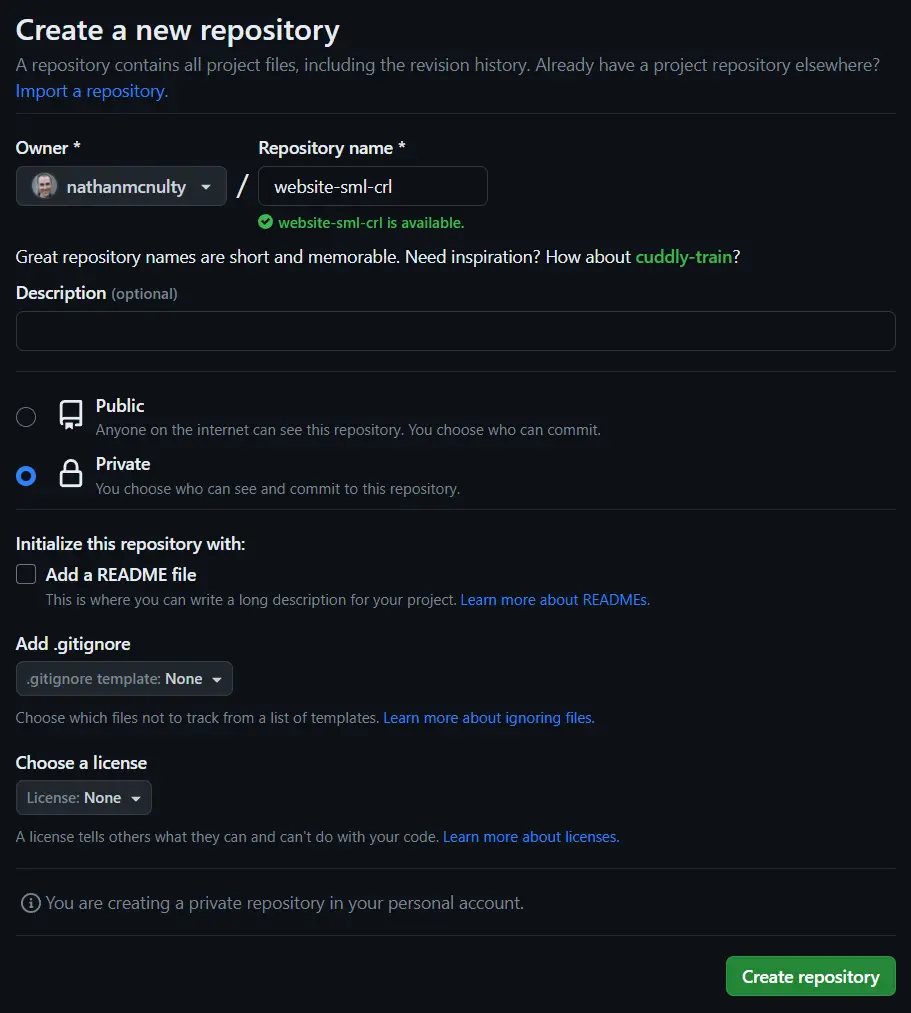
While we could technically host the public root CA certificate and CRL on our ADCS server or some internal server, I really wanted to play with Azure Static Sites generated from content in GitHub :p
First I’ll create a new repository on GitHub, and because I don’t want it cluttering up my repositories when others are looking for something, I’ll mark it as private.
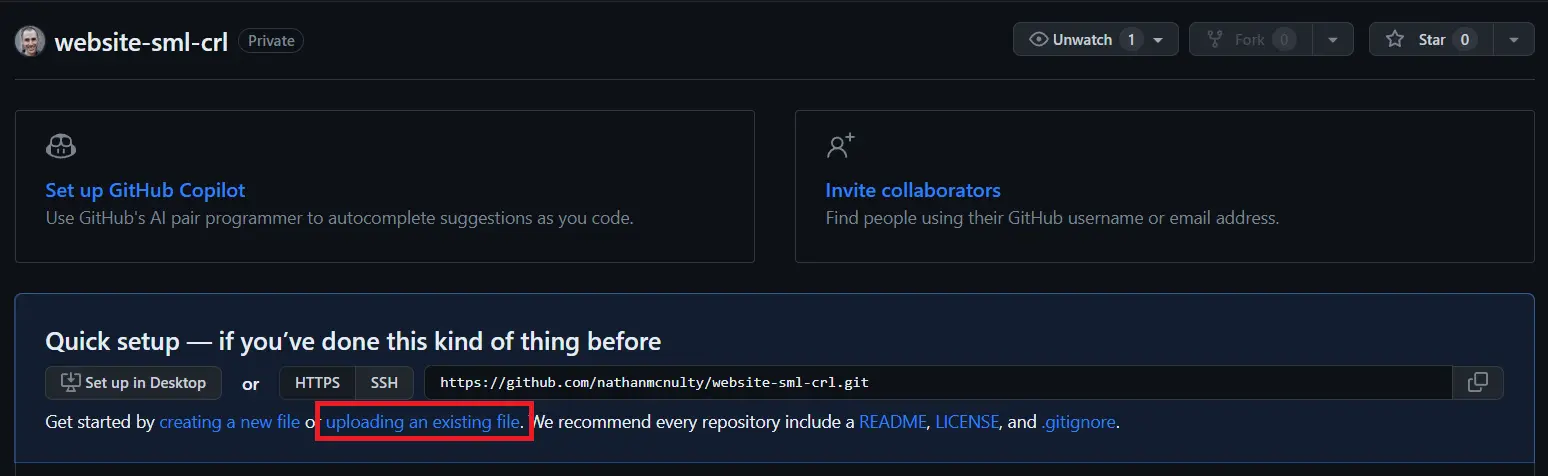
On the next page, click the uploading an existing files link.
Now add the root CA public cert, intermediate CA public cert, and the root CA CRL. You can also come back and add the intermediate CA CRL if you want later :)
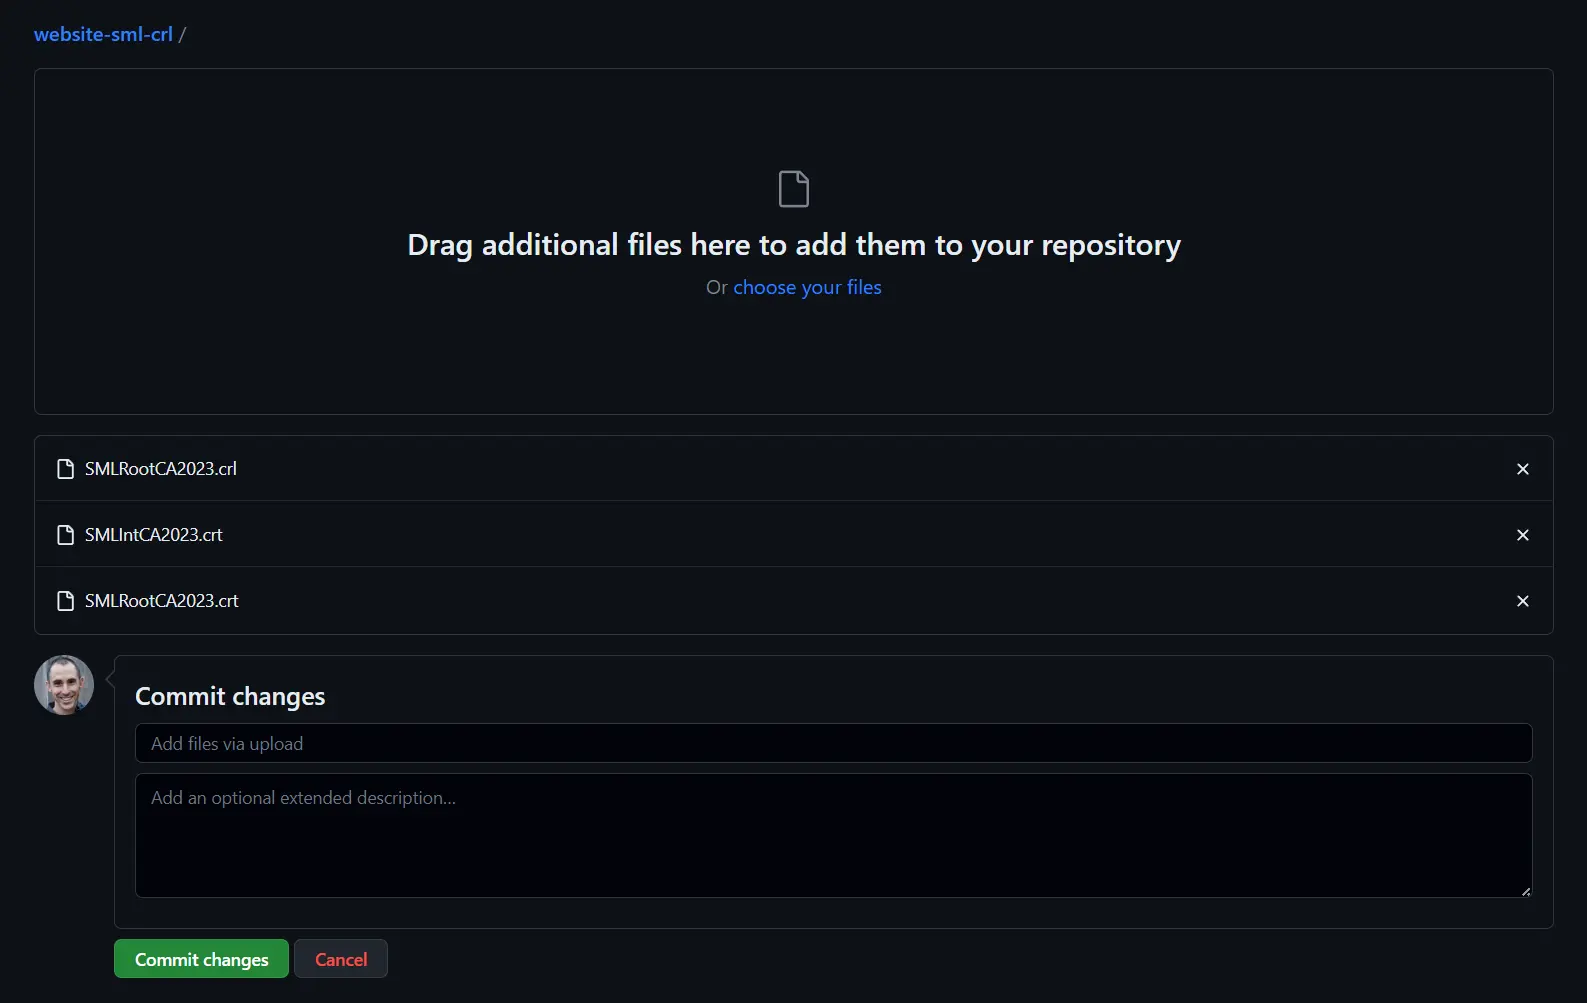
Additionally, we need to add a fake index.html file so the GitHub Actions workflow will recognize it as HTML and build correctly. I don’t know if any content needs to be in the file, but I did this and it worked ;)

Azure Static Website
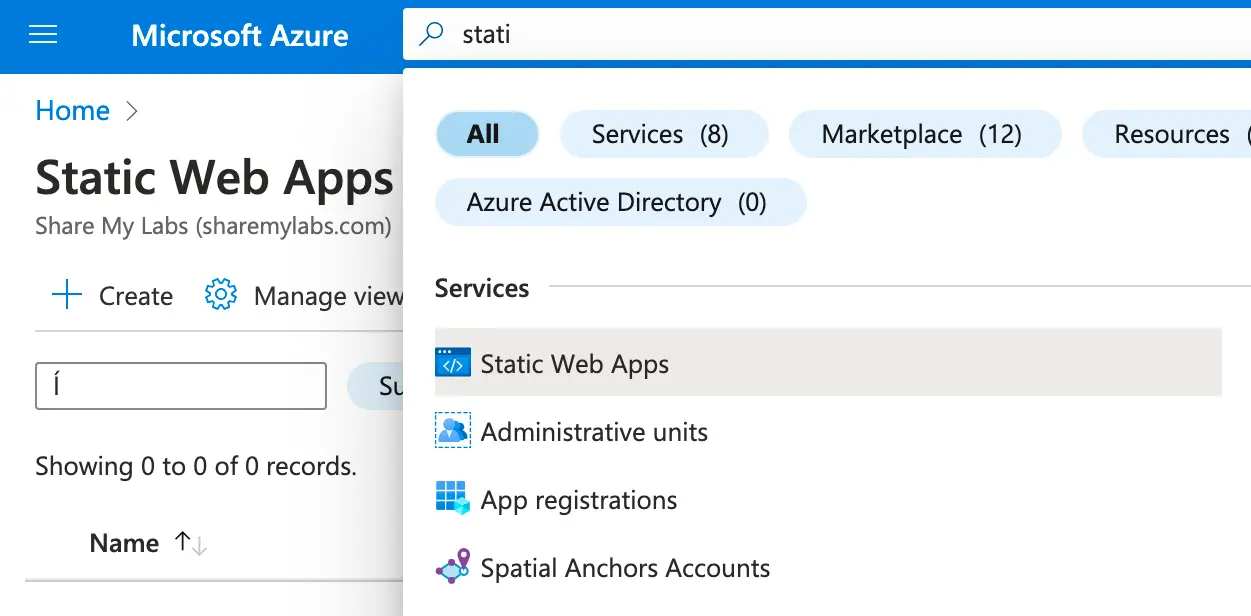
Now we’ll come over to Azure and search for Static Web Apps, select Static Web Apps and click Create.
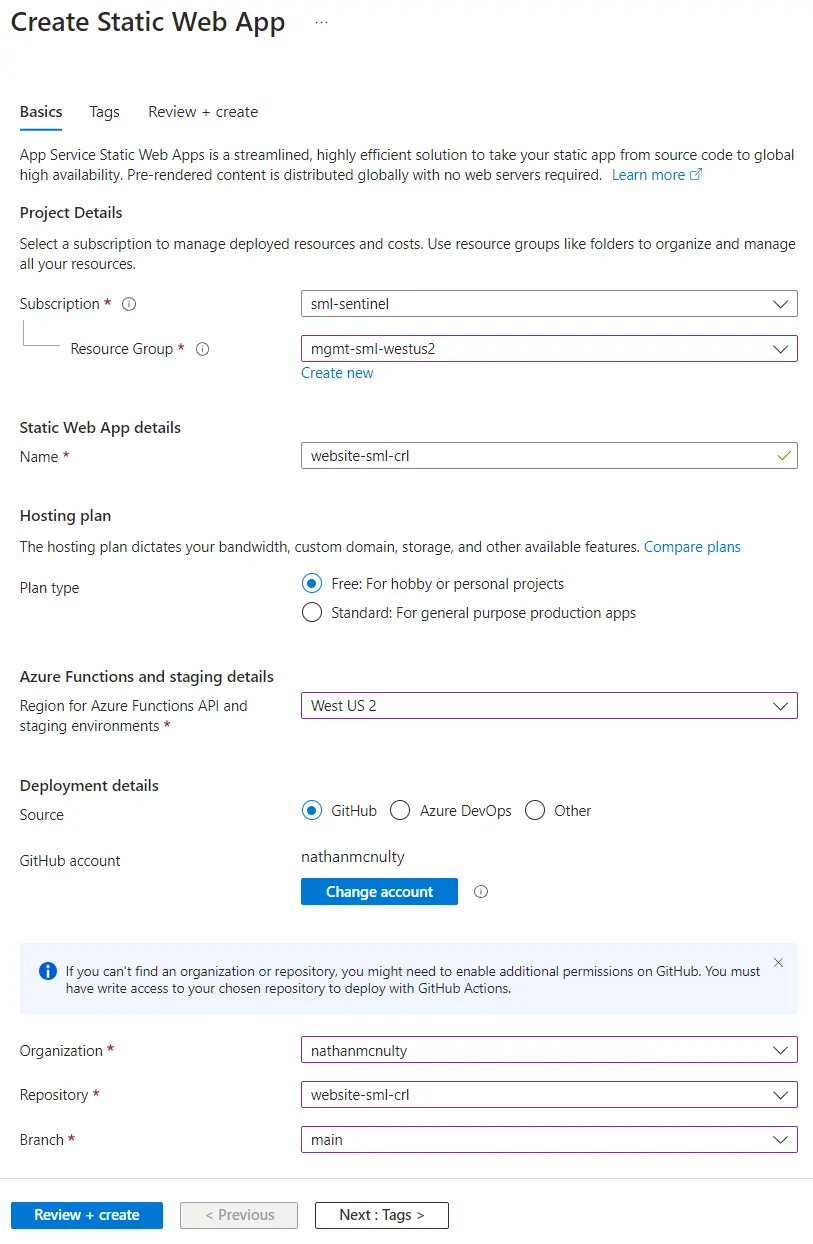
Select a subscription and resource group for the Static Web App, make sure the plan type is set to Free, and set your region. If you haven’t before, you’ll have to authorize Azure to access your GitHub account, then select the repository you created. When finished, click Review + create and create the site.
Once created, click Go to resource, then go to Custom domains, click Add and add a custom domain on other DNS.
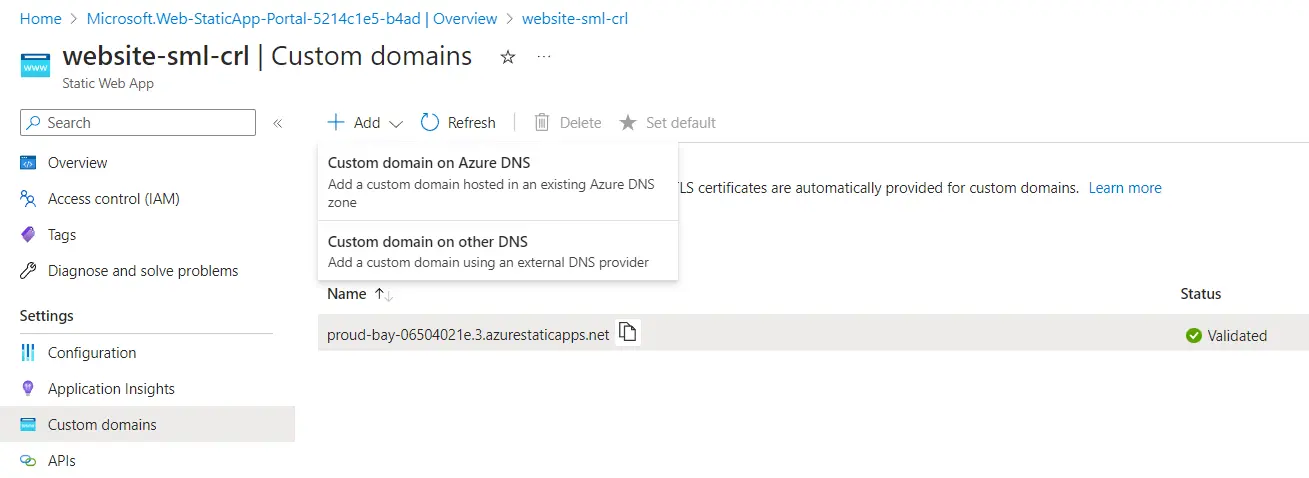
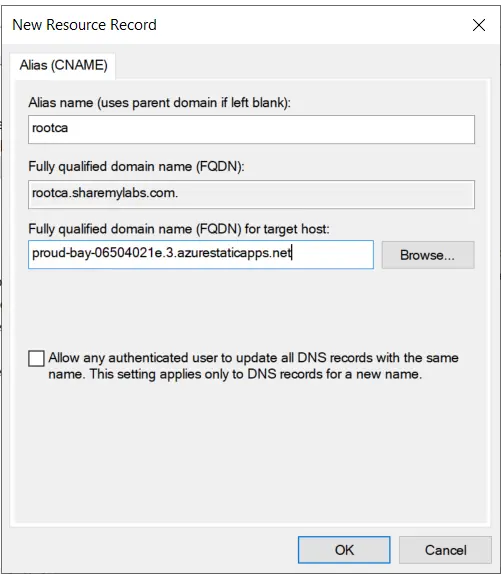
Enter the domain name you chose in your root CA CRL, click next, then add the CNAME to your DNS (internal example here, but could also add externally).
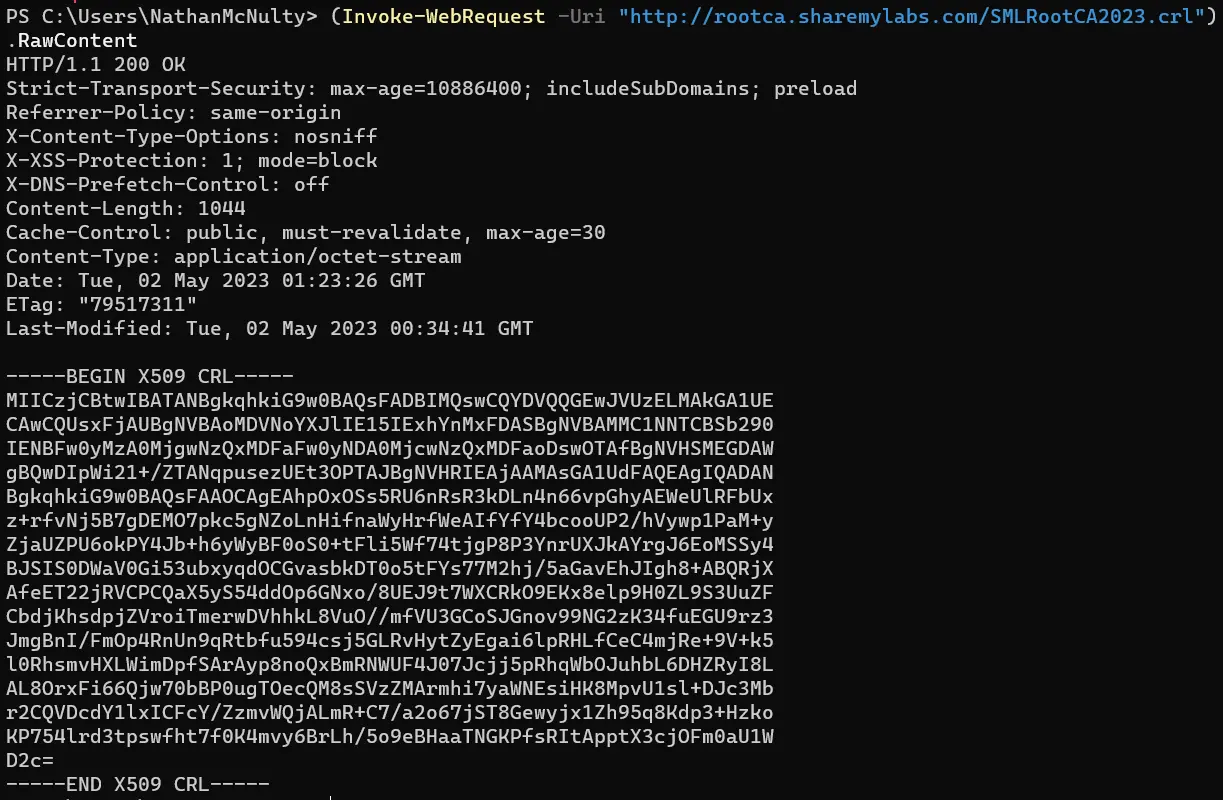
Once complete, you should be able to request the CRL from the ADCS server, and now we can
Install CA Certificate
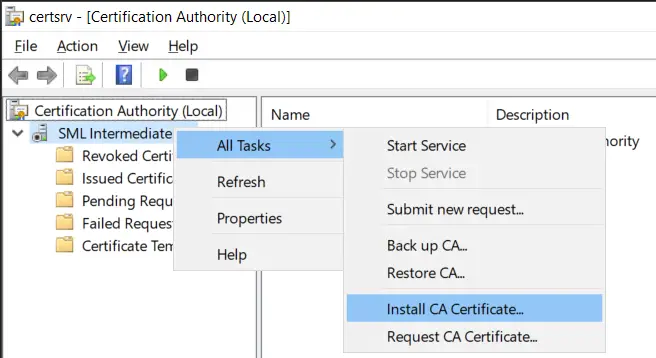
Now that the CRL can be verified, we can install the CA certificate. Back on our ADCS server, open the Certificate Authority MMC, right click on the server, hover over All Tasks, then click Install CA Certificate…
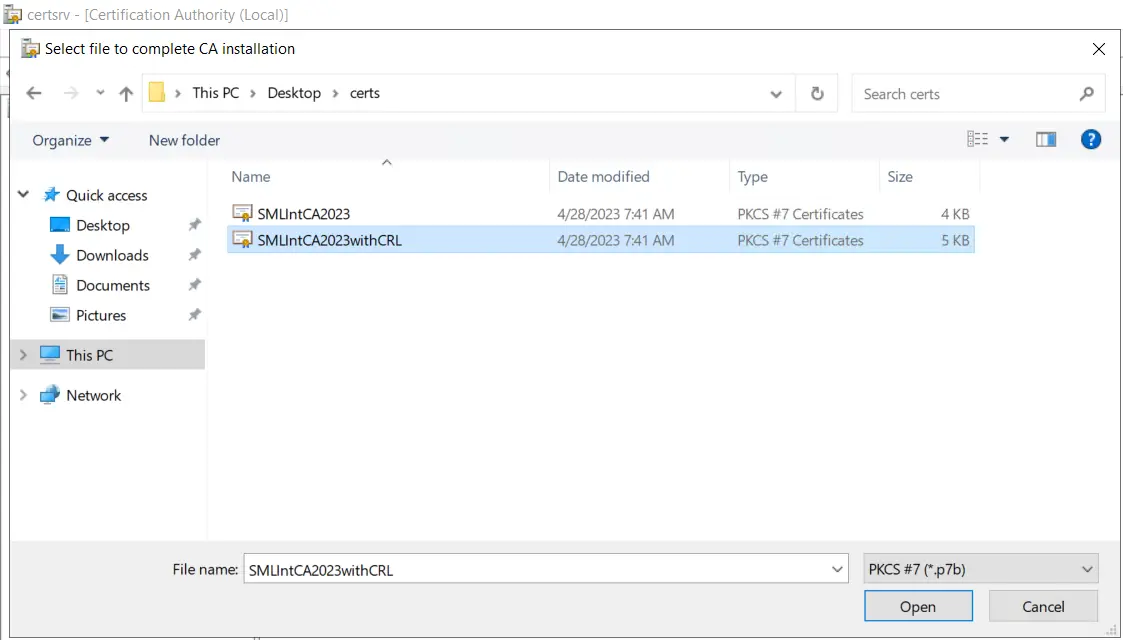
Select the P7B with CRL that we copied from the root CA server.
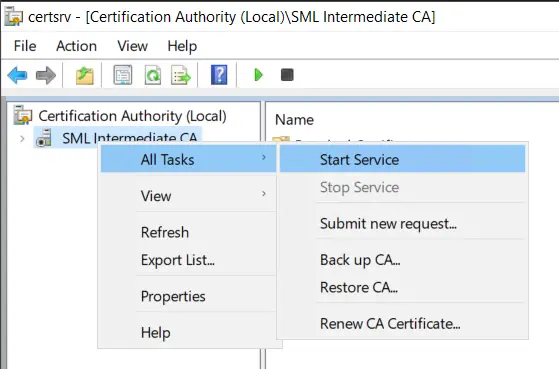
This should complete without any errors. If you see CRL couldn’t be validated, check DNS from the ADCS box to your Azure Static Website ;)
Finally, we can start the service, and we should now have a working CA!
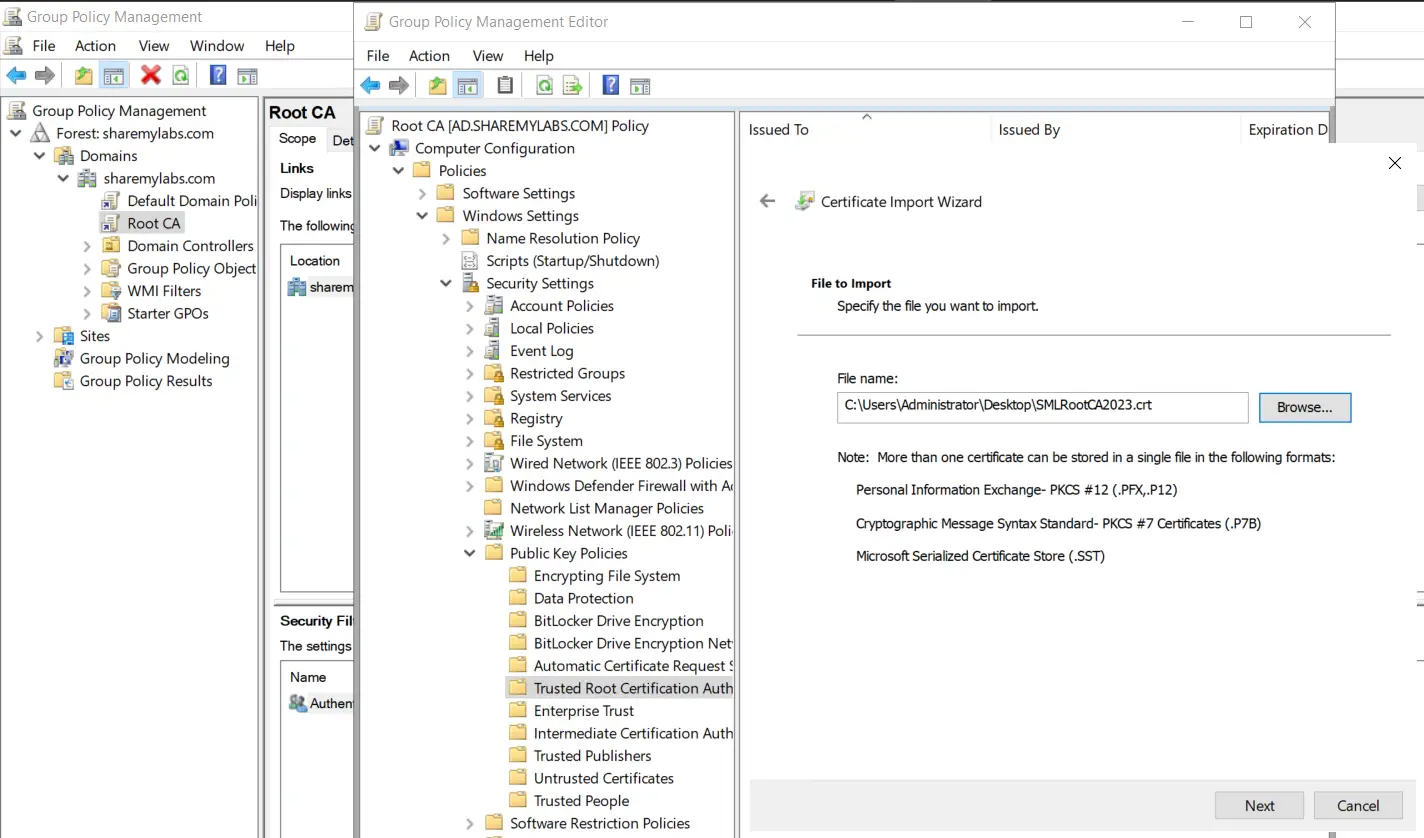
Add Root CA to Trusted Root CAs
The last thing we might want to do here is create a Group Policy object to push out the Root CA public certificate into Trusted Root Certification Authorities.
Stay tuned as I’ll have some posts on Microsoft Tunnel and EAP-TLS certificates, hopefully both PacketFence and Cisco ISE :)